
1-Partition Hard Drive Without Losing Data
Before starting note that,
- We can partition any drive, even a system drive
- We can do it only in Windows, Windows 7 and Vista specifically
So let’s divide it.
Go to Start > Right click on My Computer and choose Manage.
Disk Management Window will
Pop-up, it may take time to load it since it fetches for all the
hardware and system information in your PC. After it’s fully loaded, go
to Storage> Disk management at the left sidebar. This is where we’ll
have all the information about storage devices that are in our PC
currently connected and active.
At the right column all the storage media will be listed with their
basic information like File system type, and status. Now choose the Volume that you want to partition. Right Click on it and select Shrink Volume option from menu.
As soon as you click on the Shrink Volume option, system will search for available space in your selected Disk Volume.
This will not take much longer than few seconds. After querying, Shrink window will pop-up. This is where you’ll have to specify the Volume for next partition.
Look at the total size of available shrink space. Below it, you’ll have to Enter the space to shrink.you must make sure that the size is not below the total size of space taken by files in that drive.
You can check the used space by right clicking on the drive you are going to partition and choose Properties.
Click on Shrink button after specifying the size to shrink. The shrink
size is for the value for the partition where your old files will be
contained and remaining size will allocated for your next partition.
But you’ll still not able to access this new drive. You’ll have to
format it and specify the drive letter to access them. To do so,
continue reading.
Right click on unallocated drive and choose New Simple Volume option.
New Simple Volume Wizard Window will popup.
Click on Next button to continue.
In next window, you’ll have to specify the size for your new volume.
Set full size if you are satisfied with two partitions; else divide it
again for new partition.
Next choose any drive letter from the available list and click on Next button.
In next window, leave everything as default but make sure it’s similar to the screen below:
Click on Finish window to complete the wizard.
If you’ve autoplay enabled in your computer, then New Volume will be auto played for the first and last time.
With similar method you can also format your empty drive to create multiple partitions.
2-Use Pen drive As RAM !!
Here is the required procedure for converting USB/pendrive memory into RAM manually…
1) Plug your pendrive into PC/laptop.
2) Right Click On My Computer.
3) Open up properties.
4) Go to Advanced Option.
5) Now select Settings of Performance.
6) Again Click on the Advanced Button which is shown In the popup Window.
7) Now click on Change button shown in Virtual memory.
8) Now select the available memory of your removable USB/Pendrive.
9) Set the value and apply the changes.

... yes it is possible all the memory available in a removable pendrive/USB can be converted into RAM to increase the working speed of the computer.
Manual Method to Convert USB/Pendrive Into RAM ...

10) Restart your PC/Laptop and Thus you are done.
Here is the required procedure for converting USB/pendrive memory into RAM manually…
1) Plug your pendrive into PC/laptop.
2) Right Click On My Computer.
3) Open up properties.
4) Go to Advanced Option.
5) Now select Settings of Performance.
6) Again Click on the Advanced Button which is shown In the popup Window.
7) Now click on Change button shown in Virtual memory.
8) Now select the available memory of your removable USB/Pendrive.
9) Set the value and apply the changes.
... yes it is possible all the memory available in a removable pendrive/USB can be converted into RAM to increase the working speed of the computer.
Manual Method to Convert USB/Pendrive Into RAM ...
10) Restart your PC/Laptop and Thus you are done.
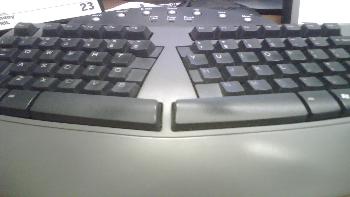
2-Cool Keyboard Tricks (Windows) : Make a Disco
Keyboards usually have small LED's which indicate whether different types of locks are activated or not. Here is a trick to use the lights of your keyboard in a more creative manner in Windows.
This trick uses a simple Visual basic script which when activated makes your scroll lock, caps lock and num locks LED's flash in a cool rhythmic way which gives the perception of a live disco on your keyboard.

To make your own live disco, follow the steps given below:-
1. Open Notepad.
2. Copy paste the exact code given below:-
3. Save the file as Disco.vbs or "*.vbs".
Double click on the Saved file to see the LED lights on your keyboard go crazy and make your own cool disco.
This trick has been tested on Windows XP, Windows Vista and Windows 7 and found to be working perfectly.
You can disable the keyboard disco by starting Task Manager and ending the wscript.exe process.T
4-Password Protect/ Lock folders in Windows without any Software
Most of us have private data. Not all of us have a private computer to keep that data. So, we just end up with other people viewing that data. Although password protecting software do work, it is almost useless to hide private data with these software(because we are always questioned as to what it is that we are hiding with the help of these software).
Hidden folders do not work as they can be easily searched with Windows Search. So, we need an alternative way to create hidden password protected folders which only we can access. And that is exactly what we will learn in this post.
With this trick, you can create a secure password protected folder in Windows which no one except you can access. To use this trick, follow the instructions given below:-
1. Open Notepad.
2. Copy and paste the exact code given below:-

3. Click on the File Menu. Click on Save As.
4. Select All Types in the Save As Type dropdown menu. Save the file as *.bat or Locker.bat.
After creating the file, double click on the Saved file. A new folder will be created. Enter your data in the folder. Again, double click on the batch file. Type Y and press Enter. The folder will be hidden from view.
To re-view your folder, double click on the saved batch file. Enter password as "tweakandtrick.blogspot.com" without quotes and press Enter key. This is also the default password. Your folder will be visible again.
To change the default password, edit the part of the code given in blue and enter your own password.
The overall usability of this trick can be improved by deleting the batch file after hiding your folder and re-creating it when you wish to access your folder again.
If you face any problem using this trick, you can write a comment and I will do my best to help you.
Note: This works on Windows 7, Windows XP and Vista. First try this on useless data to be sure and then only hide your personal data
_________________________________________________________________________________
Before starting note that,
- We can partition any drive, even a system drive
- We can do it only in Windows, Windows 7 and Vista specifically
So let’s divide it.
Go to Start > Right click on My Computer and choose Manage.
Disk Management Window will
Pop-up, it may take time to load it since it fetches for all the
hardware and system information in your PC. After it’s fully loaded, go
to Storage> Disk management at the left sidebar. This is where we’ll
have all the information about storage devices that are in our PC
currently connected and active.
At the right column all the storage media will be listed with their
basic information like File system type, and status. Now choose the Volume that you want to partition. Right Click on it and select Shrink Volume option from menu.
As soon as you click on the Shrink Volume option, system will search for available space in your selected Disk Volume.
This will not take much longer than few seconds. After querying, Shrink window will pop-up. This is where you’ll have to specify the Volume for next partition.
Look at the total size of available shrink space. Below it, you’ll have to Enter the space to shrink.you must make sure that the size is not below the total size of space taken by files in that drive.
You can check the used space by right clicking on the drive you are going to partition and choose Properties.
Click on Shrink button after specifying the size to shrink. The shrink
size is for the value for the partition where your old files will be
contained and remaining size will allocated for your next partition.
But you’ll still not able to access this new drive. You’ll have to
format it and specify the drive letter to access them. To do so,
continue reading.
Right click on unallocated drive and choose New Simple Volume option.
New Simple Volume Wizard Window will popup.
Click on Next button to continue.
In next window, you’ll have to specify the size for your new volume.
Set full size if you are satisfied with two partitions; else divide it
again for new partition.
Next choose any drive letter from the available list and click on Next button.
In next window, leave everything as default but make sure it’s similar to the screen below:
Click on Finish window to complete the wizard.
If you’ve autoplay enabled in your computer, then New Volume will be auto played for the first and last time.
With similar method you can also format your empty drive to create multiple partitions.
2-Use Pen drive As RAM !!
Here is the required procedure for converting USB/pendrive memory into RAM manually…
1) Plug your pendrive into PC/laptop.
2) Right Click On My Computer.
3) Open up properties.
4) Go to Advanced Option.
5) Now select Settings of Performance.
6) Again Click on the Advanced Button which is shown In the popup Window.
7) Now click on Change button shown in Virtual memory.
8) Now select the available memory of your removable USB/Pendrive.
9) Set the value and apply the changes.
... yes it is possible all the memory available in a removable pendrive/USB can be converted into RAM to increase the working speed of the computer.
Manual Method to Convert USB/Pendrive Into RAM ...

10) Restart your PC/Laptop and Thus you are done.
Here is the required procedure for converting USB/pendrive memory into RAM manually…
1) Plug your pendrive into PC/laptop.
2) Right Click On My Computer.
3) Open up properties.
4) Go to Advanced Option.
5) Now select Settings of Performance.
6) Again Click on the Advanced Button which is shown In the popup Window.
7) Now click on Change button shown in Virtual memory.
8) Now select the available memory of your removable USB/Pendrive.
9) Set the value and apply the changes.
... yes it is possible all the memory available in a removable pendrive/USB can be converted into RAM to increase the working speed of the computer.
Manual Method to Convert USB/Pendrive Into RAM ...
10) Restart your PC/Laptop and Thus you are done.
2-Cool Keyboard Tricks (Windows) : Make a Disco
Keyboards usually have small LED's which indicate whether different types of locks are activated or not. Here is a trick to use the lights of your keyboard in a more creative manner in Windows.
This trick uses a simple Visual basic script which when activated makes your scroll lock, caps lock and num locks LED's flash in a cool rhythmic way which gives the perception of a live disco on your keyboard.
To make your own live disco, follow the steps given below:-
1. Open Notepad.
2. Copy paste the exact code given below:-
3. Save the file as Disco.vbs or "*.vbs".
Double click on the Saved file to see the LED lights on your keyboard go crazy and make your own cool disco.
This trick has been tested on Windows XP, Windows Vista and Windows 7 and found to be working perfectly.
You can disable the keyboard disco by starting Task Manager and ending the wscript.exe process.T
4-Password Protect/ Lock folders in Windows without any Software
Most of us have private data. Not all of us have a private computer to keep that data. So, we just end up with other people viewing that data. Although password protecting software do work, it is almost useless to hide private data with these software(because we are always questioned as to what it is that we are hiding with the help of these software).
Hidden folders do not work as they can be easily searched with Windows Search. So, we need an alternative way to create hidden password protected folders which only we can access. And that is exactly what we will learn in this post.
With this trick, you can create a secure password protected folder in Windows which no one except you can access. To use this trick, follow the instructions given below:-
1. Open Notepad.
2. Copy and paste the exact code given below:-
3. Click on the File Menu. Click on Save As.
4. Select All Types in the Save As Type dropdown menu. Save the file as *.bat or Locker.bat.
After creating the file, double click on the Saved file. A new folder will be created. Enter your data in the folder. Again, double click on the batch file. Type Y and press Enter. The folder will be hidden from view.
To re-view your folder, double click on the saved batch file. Enter password as "tweakandtrick.blogspot.com" without quotes and press Enter key. This is also the default password. Your folder will be visible again.
To change the default password, edit the part of the code given in blue and enter your own password.
The overall usability of this trick can be improved by deleting the batch file after hiding your folder and re-creating it when you wish to access your folder again.
If you face any problem using this trick, you can write a comment and I will do my best to help you.
Note: This works on Windows 7, Windows XP and Vista. First try this on useless data to be sure and then only hide your personal data
_________________________________________________________________________________
Hi. I’m Designer of Blog FURQANSTECH. I’m CEO/Founder of FURQANSTECH. I’m Creative Art Director, Web Designer, UI/UX Designer, Interaction Designer, Industrial Designer, Web Developer, Business Enthusiast, StartUp Enthusiast, Speaker, Writer and Photographer. Inspired to make things looks better.
0 comments:
Post a Comment